Showing posts with label scrapstuffz. Show all posts

Thursday, October 2, 2014

Letting Off Steam and Sunshine

Hello, and welcome to October!  We have another double inspiration photo challenge, at Scrapstuffz, but we've added a twist; a word prompt to go along with each photo.  You can do one or the other or both to be in the running for the prize.

For the first photo, I decided to just go with the uber cool, icy look and dove into my Yellowstone in winter photos, and I used photos of steam being let off for the verbal prompt.  I first got a piece of watercolor paper soaking wet, then added blue spray mist.  I finished it off with some stamping with a sapphire blue ink pad.  Then I got out this cool circle stencil, applied modeling paste, then sprinkled with silver glass glitter.  For my matte, I cut off some strips of gauze, inked, then dabbed with white paint. I added my photos and die cut some clouds out of white paper and deli paper.  I went to add some more white paint, through a stencil and got some on one of my photos.  After a few seconds of frustration, I added some more on all the photos. I think it turned out cool!  A happy accident.  I finished off the piece by adding a title and some wooden trees, along with a bit of journaling.


Verbal Prompt: Let It Go

For the second photo, I went to my quotes board on Pinterest, to cover the verbal prompt, and the very first pin there just struck me.  I could really use that advice right now.  I found a pretty photo of a sunburst through fall leaves.  I love how you can see the rays actually coming out.  To create my sunburst, I applied modeling paste (seriously awesome stuff) through a sunburst stencil, then colored in with distress ink (after the paste dries, of course).  I used just one color, but added more in some spots to give the variegated look. I created a layered matte with some fun Fall color papers and added some cute embellishments and finished off with a sprinkling of stars. The final bit was to add a big title, that also stands in for my journaling.  The small letters are Fancy Pants sticker letter, that I outlined, and the large word is made up of Thickers. 


Verbal Prompt: Words To Live By

There is how I was inspired by this month's photos, let's see how you are inspired!

Tuesday, September 2, 2014

Double Photo Inspiration!

Welcome to September! I always consider this the start of the new year, not New Year's Day, and to start off with a bang, ScrapStuffz Inspired By brings you two inspiration photos! You can do just one or double your chances at being chosen as our fave and do both. Both photos are bright and colorful, but one speaks of summer and the other of going back to school. Great choices as we shift our focus from the lazy days of summer to back to school.

The first photo may be a fair ride, but it reminded me of hot air balloons. I like to think out of the box, so I went with a hot air balloon ride for my subject. My parents recently went to Turkey and my step mom and little sister took in a hot air balloon ride over some spectacular scenery! I asked for some photos to use for this post. I REALLY love how this turned out. I stuck to the earthy colors of the photos instead of the bright colors of the fair ride, though I got them in as accents.


For the second photo, I did a layout that I've been wanting to do for some time. It cracks me up when I think of my two desks. I MUST have a nice and tidy desk at work in order for me to work well. I clean up between projects, minimize the clutter, have things place at just the right place. My craft space is the COMPLETE opposite. Usually I just shove enough things out of the way in order to get going on my next project. I do pick up, but just enough to make a little room to move. I really need to sort and organize, but no way is that getting in the way of my creative time! I thought a layout contrasting these two desks would be a fun piece to do. I used office supplies for my work desk and drippy paint and such for my craft desk.


I hope you find some inspiration in this month's photos and I can't wait to see what you create!


Saturday, August 16, 2014

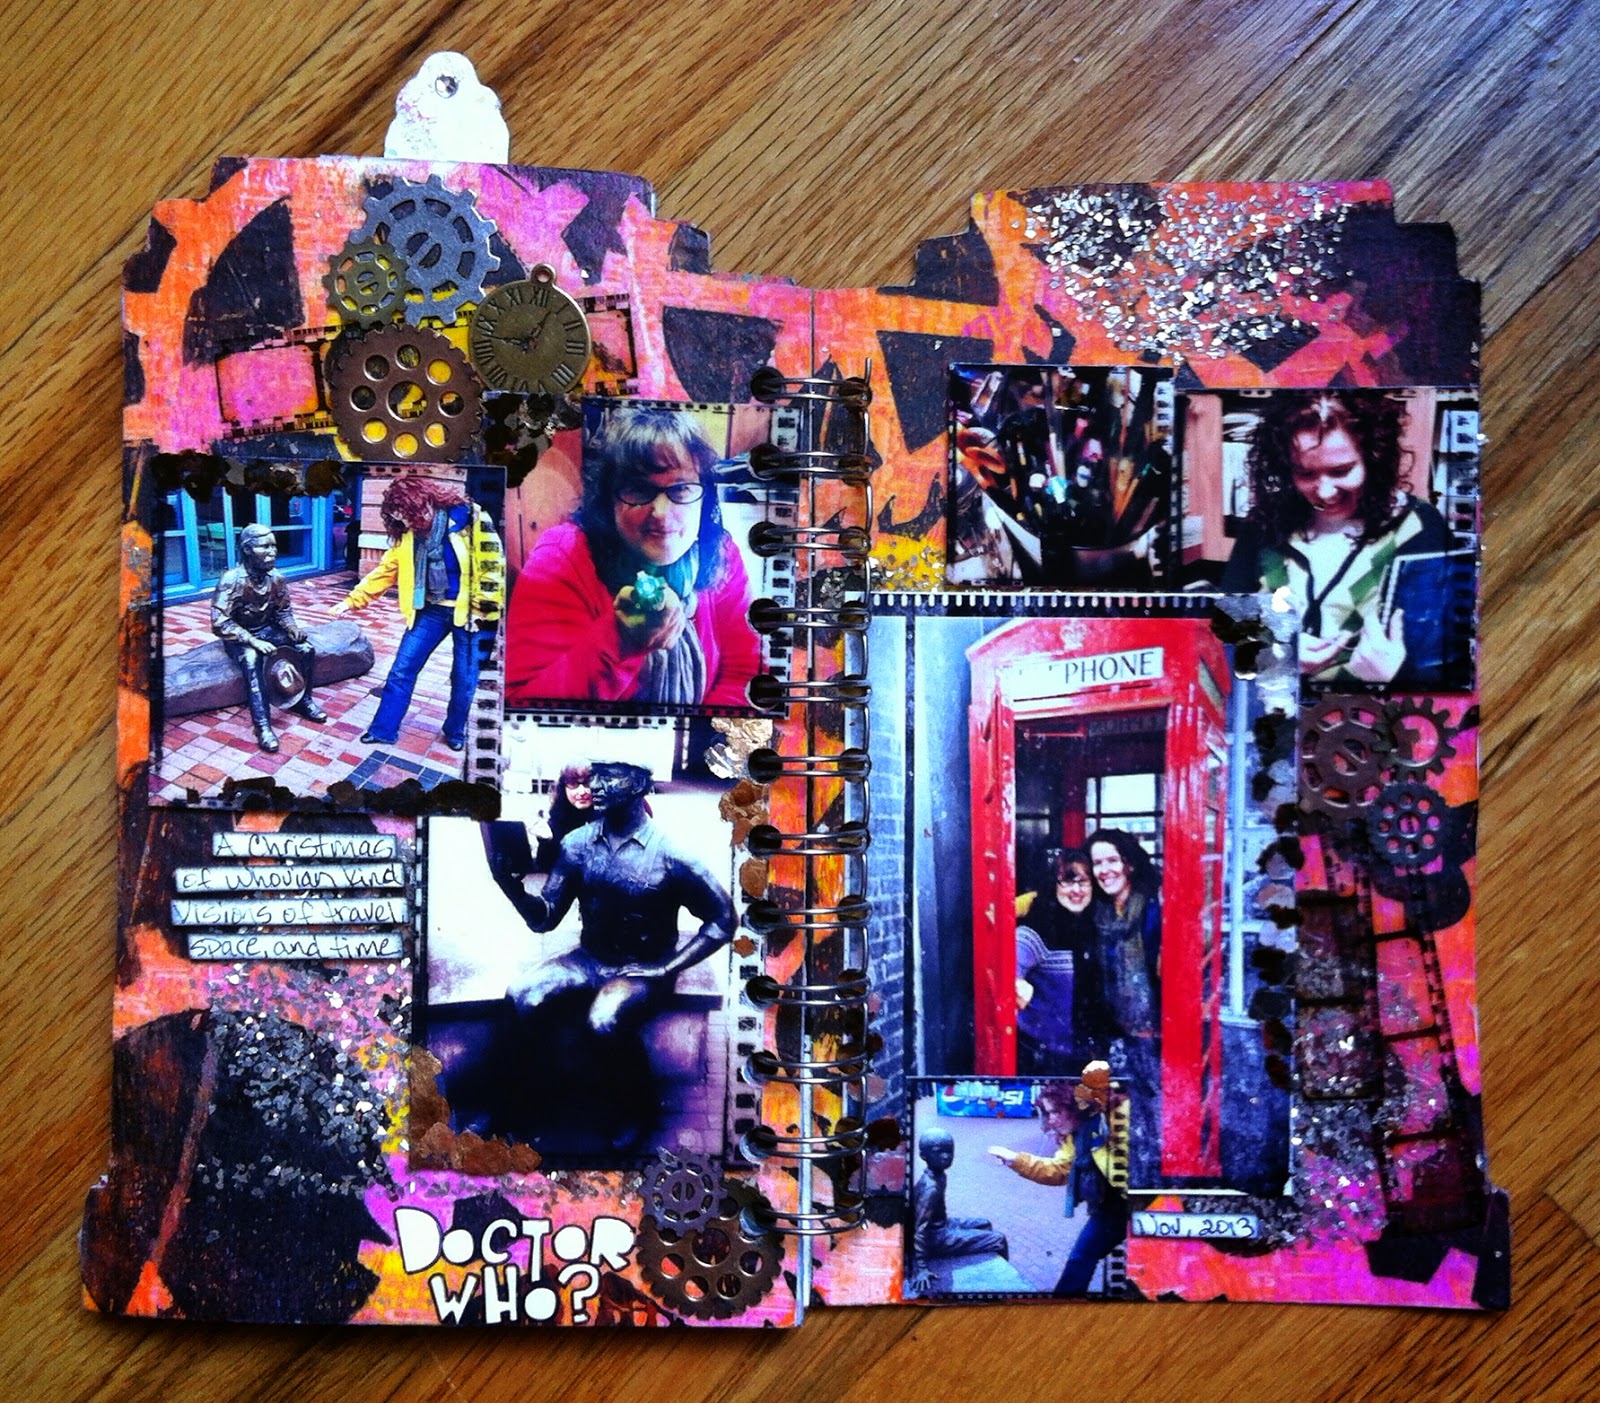
Doctor Who Mini Album

When I received my awesome TARDIS die cut, from ScrapStuffz by Stacia, in the mail, for my August reveal, I was soooo excited! It was awesome, really, it was. I decided that the larger size warranted using it to make a mini album and it would be perfect for photos of Adele and I, commemorating our time together and our obsession love of Doctor Who.


I placed the TARDIS on a piece of watercolor paper and traced the shape, giving ample room for a cool background and to give room for adding lots of photos inside. Then I grabbed some more paper and created a few more pages, four seemed to be good for the photos that I had. Next it was time to get artsy and create some backgrounds that were uber cool and spacey like. I chose a Gelli print that I had in my stash that had a suitably Whovian look. I used a bunch of adhesive and adhered it right to the paper. Next I added my TARDIS and adorned the light with a little gem.


For my first page, I used the technique that Tim Holtz used in his June tag. I took my favorite dot stencil from Crafter's Warehouse, inked in randomly with bright distress inks, sprayed with a little water, and placed it directly on to the two pages, using a paper towel to press down. It make a cool watery effect. Then I added some gear stamps, adhered my photos, adding gears, gems, and a key (you have to be able to get IN the TARDIS!). My photos didn't quite fit in the sketch configuration, but my gears are scattered much like the hexagons and I added the arrows in for the paper strips. The arrows convey action, motion and I thought they fit quite well.


For my next page, I dug in and found a super fun, super bright Gelli print (I love having a stash of prints to pull out for projects), and adhered to the paper. I stamped a circle stamp, in white, and hot air balloons, in black and outlined with white. More gears, and definitely gems, were all the page needed.


I have a lot of fun with the next page.  First, I used bead gel and my star stencil to add stars all over the page. Then I water colored with some blue shimmer paints. I removed the paint from the stars with a moist paper towel and then painted the stars with yellow shimmer paint. For the fun spacey bits, I applied gel over a cool techno style stencil, on a separate piece of watercolor paper, let dry, cut out the shapes, then dripped blue, red, and yellow ink, spritzing with some water so the colors would bleed. Of course, some more gears and gems were the perfect addition. I like that adding both of these lends both a masculine and a feminine feel to the page.


For my last page, I found a bright, fun Gelli print made using my gear stencil (hey, it's Doctor Who, there is a lot of machinery and gadgets!), adhered to the paper and then pulled out a circular stamp, stamped with a glue stamp pad, and sprinkled chunky metal glitter. I set this aside to dry and pulled out my gel and brushed edges and corners of my photos and added mica. I think this looked really cool. I pulled the pages back, but was not happy with how the glitter was holding on, and since this is a mini album, meant to be handled, I took it and sprayed with some spray art varnish. That totally did the trick and that glitter is there to stay! All I needed to do was add my photos, some more gears, and a few film strips.

I went ahead and pulled out another Gelli print to cover the back with, but I feel that I could simply add more pages in the future. All that needed to be done is bind it with my Cinch and I now have a wonderful memory of the fun Adele and I have together and with our obsession love of Doctor Who.

Be sure to upload your own project with your die cut or handmade embellishmen, maybe you even already have a die cut made by ScrapStuffz by Stacia, and the sketch made by Adele. If you don't have a die cut, you should be sure to order one, as they are awesome!


Wednesday, July 2, 2014

Gathering Place

I was so excited when I saw this month's inspiration photo at ScrapStuffz Inspired By! I love it! It's so cute and the perfect challenge to scrap my photos of the birds at my mom's feeder.  She has the coolest birds visit her. Cardinals, woodpecker, so many cute and colorful ones. We do not have cardinals where I live and I just love looking at them.  They are just so fantastic and I love sitting and watching them. It's amazing to sit and see a tree that is just dotted with all these cool birds.

I decided to add a bit of distress to my work. I used a wood grain stencil and some distress ink and water to make the watery moss like background, on top of the wood paper. I then took another stencil, a flower and bird one, some red distress ink and made the pop of red, in the background. I added my photo cluster and searched for a bird to add. I found this large wood bird and colored him red and added crackle over the top and positioned him atop some die cut twigs.

Take this opportunity to go out and look for some summer wildlife to photograph and share with us! I can't wait to see what you create.


Monday, June 2, 2014

Hello From Utah

This month's inspiration photo from ScrapStuffz was a super fun one. I just screams summer and vacation and fun, so was the perfect prompt for my epic trip to my BFF's house. Not only do I get to spend time with her, but two other friends and a crazy, whirlwind tour during the layover for another friend's daughter. I can't wait to see what the rest of my trip has in store for me!

I loved the brightly colored words, describing fun activities! I added fun letters and fonts directly on the photos in my grid. The words are all descriptive words about my trip. I also stamped icons on the photo too, resembling a infographic. I'm pretty pleased with how it turned out!


I can't wait to see what you do with this fun prompt and the fun and colorful layouts you will create!

Friday, May 2, 2014

Zen

When I saw this month's inspiration at Scrapstuffz Inspired By, I instantly thought of gardens and spring.  Lots of flowers and butterflies.  But then I went to the Portland Japanese Garden and my thoughts turned to stones.  The Zen garden was the perfect place to highlight stone!

The day was gloriously sunny and the mix of the well placed stone, the raked gravel, and shadows cast by the overhead trees was so interesting, that I grabbed my camera and began to shoot the contrasts and design.  I knew I wanted use these photos for my layout.  I knew the colors weren't going to work, simplicity is best, but I did think I would add dragonflies and butterflies, from my Japanese die cut cartridge.

I applied some black paint, to watercolor paper, with a brayer, then took my comb tool and mimicked the lines of raked gravel.  I pulled a simple green piece of patterned paper and arranged my photos.  My cartridge has a bunch of Kanji letters, and one for Zen, so I used this as my title piece, with a little stamped translation underneath.  I added a coin to the title tag, and began to think about dragonflies and such.  Then it hit me, the piece was done, other than a little simple journaling (I wrote a haiku.  It just seemed fitting).  A layout on a Zen garden should, in fact, be utterly simple,  with no extra bits, that just don't support the story, so I was done.


The inspiration photo


Let's see what you come up with!

Wednesday, April 2, 2014

Mushrooms

This month, at Scrapstuffz we are pairing up with Child's Play Challenges!  They have some really fun challenges that are based on toys we all used to play with when we were children.  And on top of that, we have a fabulous sketch!  It's just like Christmas all over again.

Our image comes from Child's Play.  I never did play with this, but I always thought they were cool.....sand art!  I love the way the colors just sort of meander, in waves, and make cool patterns.  I recently got a Gelli plate and I have to say that I am in love!  Even the hubby thinks it's cool.  He even decided that I need the bigger plate so I could make my own patterned paper.  Hello, yes.  One of the tools my kit came with was a texture comb.  It was the perfect tool to give my paint the fun waves like the sand art! I also thought these photos of this super cool mushroom would be perfect as they carried on with the colorful wave theme.  I added a few wave like embossing folders and burlap for texture.

I pretty much kept to the sketch except for using a photo cluster instead of the one photo and adding a small photo in the top cluster.  Really like how this one turned out.


Sunday, March 2, 2014

U Color My World

I fell in love with this month's inspiration photo, at ScrapStuffz Inspired By, as soon as I saw it!  Such fun!  I tried, a few times, to re-create some of that artsy, lined, fun color, but with catastrophic results! Then I remembered the Story Teller line by Crate Paper and this great piece that is colored pencils.  I had no clue what to do with it, but I really liked it.

I just took a whole piece and cut out various sizes of hearts and clustered them together. I made three groupings, then built a layered matte for my photo, all on a black base so everything would just pop off the page.  I also used color as part of my title and story.  Funny, I haven't made a layout that is only paper and no mixed media for some time, but I really like how it turned out!


I can't wait to see what you create this month!

Sunday, February 2, 2014

You And Me

Ahhhhh...February, the time to remember the ones we love.  A time for sweet treats and lots of pink and frills.  Now I don't really get into Valentine's Day that much.  I like to remember the people that I love everyday.  To let them know that I do.  The whole year round.  And I'm really not into the frills and pink either and quite frankly, I'd rather have a bag of chip instead of a sweet treat.

That said, I love this inspiration photo!  Isn't that polka dot tea pot cute???  And I love all the different toppings on the cupcakes.  I took some of that to be the inspiration for my layout.  I love those polka dots, so I drew circles, in various sizes and water colored them in.  I also added the shiny sequins to give that extra pop.  I also love the layers of cupcakes and the bright colors.  I decided to make some really wow colored Gelli prints and then tore them into fat strips and layered them on the background.  I even have polka dots in the prints as well as other designs, mimicking the fun cupcakes.  I took this photo with my hubby on a recent visit to the coast.  It is just a photo of our two shadows, but I really like it.  A great day is a day spent with him and they can happen at any time of the year.  I used the Rhonna Designs app to create the added layers on the photo, and really am pleased with how it turned out.  Add a couple of hearts and a bit of lace and there you have it, a layout about someone I love, when we were just hanging out.


Let's see what you find for inspiration! 

Thursday, January 2, 2014

Dreaming Of Spring

Hello, and welcome to 2014!  Our first post is for all of you peeps who are frozen in and dreaming of Spring. Ah...the warm breeze, the fragrant flowers, and time spent just relaxing and soaking it all in.  Doesn't this photo just make you want to grab a cuppa and sit a spell?


I loved the cascading flowers, so that is where my inspiration started.  I penned some simple flower doodles, then painted in with watercolors.  I was also inspired by the patterns in the lantern and the chairs.  This mosaic punch and fun MME paper did just the trick.


So dig yourself out of that snowbank and let's see your dreams of Spring!


Monday, December 16, 2013

Black Friday

Welcome back for the 2nd of our December inspiration challenges at ScrapStuffz  Think of it as our gift to you, our wonderful players!  For our second inspiration photo, Stacia chose an great grid design!  So many options with this photo.  I love the overlapping photos, the news print, the simplicity.


I really liked that print background and I was hunting for some paper that simply had writing on it.  I just was striking out when all of a sudden I found this columned piece!  Talk about a score!  I went with the matted photos that overlap each other.  I decided to use red instead of green because I brought home the Starbucks bag from our annual breakfast stop.  This year my hubby decided to join us.  We really did have a ball.  Even me, who didn't want to go in the first place and hates shopping!


Ready, set, CREATE!

Monday, December 2, 2013

Best Gift

First off, I LOVED this inspiration photo!  It is just so fun and festive.  Here it is again, if you lost it.

Isn't it such a cool idea???  I would so do this if I had a truck like that.  I was so very inspired by the dark background with the bright lights, that I decided to do just that.  I got out a piece of black, spritzed with with spray ink, then through sequins at it, in super bright colors, then glued them down.  I added the ribbon to be like the strung lights too. I really like this photo of us last Christmas and thought it made for a pretty backdrop to get it scrapped.  


I can't wait to see what you come up with for you creation!

Saturday, November 2, 2013

Love


Try as I might, but the only thing I could think o,f for this month's inspiration photo, was Thanksgiving.  That is ok, because I still hadn't done anything with last year's pics.  I didn't take a ton; just a few with my phone.  But with all the fun apps you can get on your phone now, you get some pretty awesome photos without having to haul around a large camera.

As well as thinking about Plymouth Rock and the first Thanksgiving, I also love the warm colors and the lines on the ship, which I used stitching to mimic.  To create my layout, I first took some watercolor paper and sprayed it with spay inks, two colors, and misted with water.  Then I misted with a brownish ink on my craft mat and pressed the paper into the dots and splats.  I added a stamped water ring and two film strips.  Then I laid my photos into the grid and stitched in between.  Next, I matted the watercolor paper, which was under 12x12 to a piece of dark brown card stock, adding more stitching around the edge.  Finally added the extra bits and journaling.


Be sure to link up your page by the end of the month for a fabulous prize!

Sunday, October 20, 2013

I {Heart} Fall

It's the first ever ScrapStuffz Inspired By blog hop, Hooray For Fall!  You should have come here via Shirley's blog.  If you get lost along the way, be sure to go to ScrapStuffz to find the full hop list.

We were given this inspiration photo

And this sketch
This is what I came up with

Seriously, Fall is my favorite time of the year.  I think the new year should start September 1st, not January 1st.  I love the crispness in the air, the color in the trees.  I love football and school starting just seems like a new beginning.  We have these concrete sculpture things at a park in town that have shape cutouts in them.  I lined up my shot, through the heart shape, to include the pretty leaves in the background.  

To make my background, I die cut some leave and applied some gel medium through the negative.  Then I pulled out my new gellatos and scribbled color in various places, wet, and spread around.  I set it aside to dry and when I pulled it out, I almost chucked it to the side because it was really bright and not quite the look I was going for.  Instead, I pulled out my distress ink and stamps and went to work grunging it up.  I like it a lot better!  It gives that rustic feel that comes with Fall.  The leaves not only turn colors, but start browning and have a cool distressed look about them.   I added some burlap and paper, a fun embellishment, cute title letters and a bit of journaling.  

I hope you have enjoyed your stop here.  Be sure to play along by leaving comments, making your inspired by layout and joining ScrapStuffz.  Your next stop on the hop is Devra!  Be sure to find our what creative genius she has for you! 


Monday, June 3, 2013

Death By Glitter

I was recently asked to join the design team at a new challenge blog Scrapstuffz "Inspired By".  Stacia has been my friend for the last couple of years and I am really excited to see where she is going with her scrapping.  This site gives you a little tease to get your creative juices flowing.  Each month a photo/image will be posted to help you be inspired.  Look at the photo/image and see where your imagination takes you!

We all were given this photo to use for inspiration


At first I didn't have a clue where to go with it, but then those bright stripes, on black, just jumped out at me!  I went a got a black piece of cardstock and started looking for paper in all colors.  Then the washi tape called my name and in no time I had a cool background made and set off to find photos.  I've never done a layout in that order before!

I chose these fun photos from my friend's visit.  She likes to claim that she is severely allergic to pink.  One morning she would not get up so someone suggested that I sprinkle pink glitter on her.  I think I used too much because it seems that I have killed her...


Be sure to play along, I can't wait to see what you come up with!