Showing posts with label GIU. Show all posts

Sunday, March 15, 2020

Growing In Unity Blog Hop

Welcome to the January/February Growing In Unity Blog Hop!

I had such a great time with my GIU week and I'm excited to share a project using the kit I received as a thank you. I chose Wonder, the November 2019 Kit of the Month. It's perfect for my wanderlust self and photos from my trips.

I loved the girl with her packed suitcases, so I chose to use her in my traveler's notebook spread documenting street life in Arusha, Tanzania. It's fascinating to watch life being lived. There is so much activity and what seems to be a chaotic environment, but there is order here. I chose to stamp her right onto my Gelli print background and leave the suitcases as is. I love the texture. I used opaque watercolors to color in the girl. You still get some of that texture showing through, but have the vibrant color too. I love how it turned out and I can't wait to get back to Tanzania. I have to go visit the piece of my heart that I left behind.


Wonder {kom 11/19}

Be sure to visit all the blogs along the hop and leave those comments for a chance at an awesome Unity prize! You can find the hop order below.

Edelmira - www.winecheesescrapbooking.blogspot.com
Katie- https://katiedufourblog.wordpress.com

Laura - https://www.tapthumpart.com/2020/03/giu-blog-hop.html <<<You are here
Linda - https://blueskyscrapping.blogspot.com/.../unity-giu-blog...
Joyce - https://1ashjoy.blogspot.com/
Karen -https://www.tapthumpart.com/2020/03/giu-blog-hop.html
Selena -https://www.facebook.com/Live-Love-Craft-238059246879098/...


Until next time, happy stamping!

Friday, January 31, 2020

Unity GIU, Day Five: 1 Stamp, 5 Projects: Art Journal

And so it has come, my last day as your GIU gal for Unity Stamp Co. It's been a great week and I hope I have shown you that your stamps can be used for more than just card making. 

To finish off my week I have decided to get whimsical and colorful spread for my art journal. An art journal is a fabulous place to play around, try out new techniques, and just create for the fun of it. I decided to go all rainbow. I saw a cute meme on Facebook the other day and it inspired this page. The Cuddlebug Zebra is the star, with a guest appearance by the cloud from Sending Up Something Beautiful Be sure to see how it was made by viewing the video below.


Cuddlebug Zebra

Sending Up Something Beautiful

Thanks for joining me this week. I hope I was able to show you how to stretch your stamp stash to use in a variety of project formats. Be sure to leave comments on all the days so that you have a better chance at winning one of the prizes! Until next time, happy stamping!


Thursday, January 30, 2020

Unity GIU Day Four: 1 Stamp, 5 Projects: Traveler's Notebook

Welcome to day 4 of my GIU week. How can it be day four already‽ Today I am using the Duddlebug Zebra to embellish my traveler's notebook.

A traveler's notebook is a bit of a mini album. they are designed to be slim, something you can travel with. You can add bits and bobs whilst you are traveling or you can fill them when you get home. Many people use them to just document everyday life too. I think it would be fun to do an "A Year In" project with one. I made this one before I left and plan on filling it with stories from my trip.

I used the image of the zebra as well as stamping the grass onto the background.


Cuddlebug Zebra
Come back tomorrow for my last day as your GIU gal. I can't believe it's almost over. I saved something a bit of fun for you tomorrow. Be sure to leave a comment to be in the running for one of the grab bag prizes. Until tomorrow, happy stamping!


Wednesday, January 29, 2020

Unity GIU Day Three: 1 Stamp, 5 Projects: Canvas

Welcome back to day three of my GIU week. I'm exploring different ways to use our stamps by showing a variety of projects.

Today the cute lil zebra will be starring in a canvas. I have a little display of wooden animals that I bought back from Africa and this canvas fits right in. The sunsets there are seriously amazing. I think it's all the dust in the air, so I made my background to reflect the amazing sunset. Yes, my burlap is back, this time as a stand in for grass. Be sure to watch the video to see how this came together.


Cuddlebug Zebra


Be sure to tune in tomorrow for my next project, showing you how to stretch your stamps in so many ways. Be sure to leave a comment each day so you can have a chance to win one of the prizes! Until tomorrow, happy stamping!


Tuesday, January 28, 2020

Unity GIU Day Two: 1 Stamp, 5 Projects: Layout

Welcome back to day two of my GIU week. Hopefully you tuned in to yesterday's post. If not, go ahead and take a look. I introduced my intention to use one stamp kit and show how versatile it can be by using it on five different types of projects. Today I'm taking a look at how to use stamps in scrapbooking.


For this project, I made an embellishment spot to add to my layout of zebra seen on my recent trip to Tanzania, Africa. Pundamilia is the Swahili name for zebra. I really enjoyed the zebra sightings. They are super smart, friendly, family oriented, and just fun to watch. I love their stripes. The coolest zebra encounter I had was seeing a very pregnant female, close up. She was so close that we could see the baby moving inside her! 

I stamped the Cuddlebug Zebra out onto a circle spot, colored the grasses the color of the dry season and added it onto my layout. Simple and easy way to stretch your stamps for different formats of paper crafting. You can see how this came together in the video posted below.


Cuddlebug Zebra

Brian Guy

Meant for Adventure


Be sure to leave a comment on each post this week to be in the running for a prize of your very own deeply etched red rubber! You don't want to miss out. And be sure to visit the Unity site to check out what's new and what's on sale. I'll see you tomorrow with another type of crafting project using our favorite cuddly zebra. Until tomorrow, happy stamping!


Monday, January 27, 2020

Unity GIU Day One: 1 Stamp, 5 Projects: Card

Hello, fellow Unies! Welcome to my GIU week 2020. This week I thought I would look at different types of projects to use our stamps on. And for an added bonus, I am using just one kit all week, with a few supporting kits here and there.


The star of this week is the adorable Cuddlebug Zebra. Isn't he just the cutest? I got to go on safari in Tanzania, Africa last year and I came to love the zebra. All the cats were so cool and I got to see a lot of them, but the zebra are everywhere and they are so smart and seem very caring within their herds and look really cool against the golden grasses, a look that I tried to convey in my card with the color palette and burlap texture. Be sure to check out the video of how it was put together below.

Cuddlebug Zebra


Be sure to leave a comment to be in the running for a prize of some deeply etched red rubber of your very own. Tune in tomorrow to see this lil guy in action on a project of a different kind. Until then, happy stamping!

Sunday, July 21, 2019

GIU Blog Hop

Welcome to the GIU blog hop! I decided to showcase the kit that I picked out as my reward; Enjoy Where You Are. I have had a number of people tell me that I look like the girl in this kit. I love everything else this kit has to offer too. I love these banners; they are going to be great for birthdays and other celebrations. The flowers are amazing too and who doesn't love some good stitched stamps?


Next up in the hop is Joan. Be sure to comment for a chance at winning a giant grab bag of Unity Deeply Etched Red Rubber.

Until next time, happy crafting!

Friday, June 7, 2019

GIU Day Five - Design Principles

*sniff* here we are, my last day as the GIU gal. I'm also wrapping up my design principle series. There are plenty more, but I only had five days, so you I brought you the ones I think about most when in my creative space; whether it be creating cards, layouts, or a crafting a photo.

Today I am going to tackle flow. Flow simply means the way that your eye travels through an art piece. Now here in the Western World, we are trained to read from left to right, top to bottom. It's how our printed materials are laid out, so it's how we view art. There are a number of ways to help your view move through your artwork, but I'll look at two.

Left to right, top to bottom:

Like I said above, this is how we read, so this is the first way our eyes are going to think to move. Another way to think about this is our eyes are moving at a diagonal. Diagonal lines are something I always look for in a photo composition because I find it much more interesting than a straight line across and it causes your viewer to linger longer. I hope you can see this theme that runs through the whole week. You've invested time and heart energy into what you create and you want people to linger and enjoy, not just sweep through and be on to the next thing. To move simply from left to right or right to left, in the center, does just that. The eye just sweeps through and the brain moves on. By creating this diagonal line, you're inviting the view to take their time and enjoy.


Z line:

Creating a Z through your work, you're inviting your viewer to linger even longer, but still having order in your piece. An example of this is to begin at the top left, move to top right, swoop down to the bottom left and then end up at the bottom right. You see how much longer it takes to move through, using a Z line? My Z starts with the clouds on the left, moves to the cloud on the right, picks up at the bird and flower, follows down the mouse, and finishes along the grass.


I hope you have enjoyed this peek into what goes through my brain as I work and maybe even find it useful when you create too. It's been nice really thinking about why I do what I do and researching the why. Our brains are so cool and I love learning more all the time.

Be sure to comment for your chance at some deeply etched red rubber of your very own. And while you're at it, subscribe to this blog so you can keep up with what is going on in my craft room. Thanks for joining me, I've really enjoyed being with you!

Until next time, happy stamping.

Thursday, June 6, 2019

GIU Day Four - Design Principles

Hello and welcome back to day 4 of  my GIU week. Remember to comment for your chance at winning some deeply etched red rubber.

If you're just joining in, I've been tackling some design principles this week. Today I'll talk about balance. And while I'm not so much talking about not falling off a balance beam or curb, I am referring to visual weight, and oddly enough, it can feel like a 2-D creation is going to topple or tilt. Why is this? Our brains are cool. I watched a series on Netflix last year about how the brain works that was fascinating. There were entire episodes on how our brains are fooled by what information the eyes pass on. Balance principle is example of this. If our eyes are showing a visual imbalance, our brain actually feels that it might tip or topple. Interesting, huh? Today I will discuss three ways to achieve balance.

First up is symmetrical balance. I'm sure it seems self explanatory; symmetrical insinuates equal measures on either side of center. If you use one of these on the right side, be sure to add it to the left too. You can think of  it as a mirrored effect. That said....it's always good to bring just a bit of asymmetry into a symmetrical design. If you remember what I said yesterday about the brain liking order so it can move on, you'll remember that we want to invite it to stay and linger. Just a bit of asymmetry accomplishes this. Such at in the two sentiments being on top and bottom, but swapping sides of the main images.


So if we have symmetrical balance, that must mean we have asymmetrical balance. This means our mirror is gone, but we still achieve balance by arranging our elements so that the sides have equal weight. If you have a large image on the left, have a group of smaller ones on the right. If you have a large sentiment in the bottom right, add a banner cluster to the top left. This gives balance to the overall design. It's all a matter of perception; how the arrangement makes the brain feel.


Finally, there is radial balance. You achieve this balance by creating circle with your elements. Using the Gina K wreath builder system a perfect example of radial balance. You can see that there is symmetry horizontally, vertically, and diagonally.


I hope you return tomorrow for my wrap up to design principles and my week as the GIU gal.  Be sure to comment for a chance to win the deeply etched red rubber prize and consider subscribing to this blog to keep up with what is going on in my craft room.

Until tomorrow, happy stamping!


Wednesday, June 5, 2019

GIU Day Three - Design Principles

Welcome to day three of my GIU week! We are over halfway there. I guess you're either glad or sad, but hopefully a bit sad.

Today I have an odd one for you....

Odd numbers that is. Odd numbers of things create more interest. Our brains like symmetry and order, so when you use an even number of elements, the brain says, "Oh, that's nice and orderly, check", and moves on. But we want people to linger over our hard work and having an odd number of elements slightly confuses the brain, causing the viewer to pause and really look. That's what we want, right? Right.

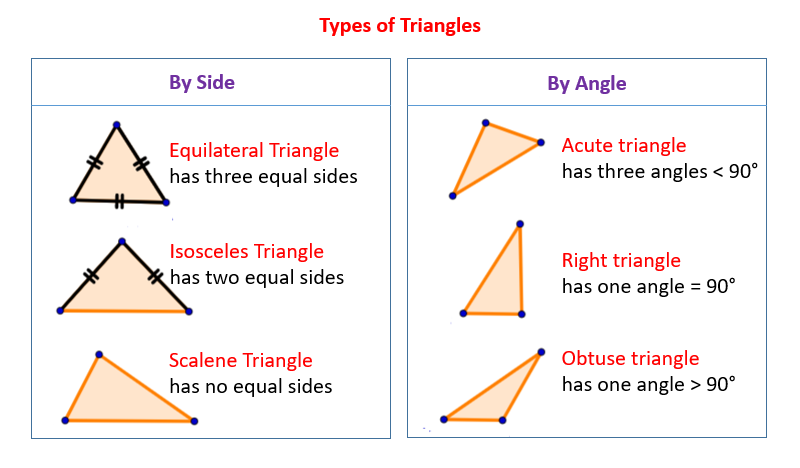
There are ways to get odd number amounts, including using even numbered items in places. Wait, what? Think of it this way. You can use a pair of sequins in one part of your card if you use three in another. 2+3=5, so you have an odd amount in the end. To add even more interest, arrange your odd number of things in an odd pattern. What do I mean by this? Try to avoid using equilateral triangle (like the top 2 left ones below), but rather, opt for the unevenly spaced ones (like the remainder of the triangles below).
Image result for types of triangles
https://www.onlinemathlearning.com/types-of-triangles.html


Another way to get an overall odd amount is by utilizing the visual triangle. The brain likes the flow of the triangle, so you are creating an odd number just by using an odd numbered shape for placement. Again, reference the type of triangle you are using. My triangle starts at the squirrel, goes to the cloud and sentiment, then ends at the mushrooms.


I hope you found this oldie, but good principle helpful and maybe learned the reason why it works. I shall be back tomorrow for another design principle. For now, don't forget to leave a comment for your chance at winning some deeply etched red rubber.

Until tomorrow, happy stamping!

Tuesday, June 4, 2019

GIU Day Two - Design Principles

Welcome back to day two of my GIU week. Be sure to comment for your chance at winning some deeply etched red rubber of your very own.

Today I'm all about the texture. I feel that texture is an important design element as it helps bring a sense of 3-D to a 2-D medium. Our brains love texture. Think about looking at something perfectly smooth, say a clear marble. There isn't much interest in looking at a clear marble, your eyes just sort of glide over it and move on to the next thing. But we're trying to engage the viewer, make them linger, so think of one of those fancy marbles. You know, the ones with the cool inside swirls. Your eye lingers over these marbles, trying to figure out how they got so much texture inside. They take up the same space, yet the cool marbles seem more 3-D that the clear ones; there's something flat about them, even though they are round.

Cool lesson, Mooney, but how does this relate to cards? Glad you asked! We want our viewer's eyes to linger over our hard work and adding texture helps with this. We are working in a 2-D format, so how can we add texture.

Texture Using Textured Items

I know that sounds kind of simple, but I think we often forget the value of textiles on our cards. One of my favorite textiles to use is burlap. Burlap is so interesting and can be used in many ways. It can be used as mat, in place of paper. It can be used like one would use a banner or washi tape. It can be used to ground, even as ground itself. You don't have to stick to burlap though. Fabric, twine, pom poms are all examples of textiles. You can even fold, tear, and scrunch paper to give texture.


Texture Using Art Mediums

There are a variety of textured art mediums out there. Modeling paste, gesso, mousse, glitter, thick paint, you get the idea. These items can be used just straight on the page, through a stencil, stamping, the sky is the limit. Adding these to your project draws your viewer in and makes them want to touch it.


Texture Using Dimension

You can create texture just by adding dimension. This litterally takes your 2-D project and makes it a 3-D one. The most popular and easy method is to use pop dots or foam tape. I love the look I achieve by elevating parts of my card. Another way to add dimension is to add layers. Paper layers really do a lot to add physical dimension as well as perceived dimension. As you can see, I even added distressed edges on two of the papers and crinkled my deli paper, adding even more texture.


Texture Using Illusion

We don't have to use actual texture or dimension. There are ways to fool the brain into thinking there is dimension on a card. This is particularly advantageous on a single layer card. Here are some ways that I use illusion to create texture.

Texture background stamp: Unity has a number of awesome texture stamps. I'm thinking the newest stamps by Brutus Monroe, for example. You can have the look of textile with just ink.

Splatters: I'm not sure why splatters add texture, I just know if I feel a card is missing something, I often add splatters. Maybe our brains think those lil dots of ink are raised.

Masking: you can give the illusion of dimension by masking your focal image, then adding the background on top of it. Once you pull the mask off, you're left with the feeling that it's actually popped up, when it isn't.

Shadowing: Adding a shadow around a person or object fools the brain into thinking they are 3 dimensional instead of flat pieces of paper. Don't forget to shadow and highlight within too. The brain thinks there are valleys and hill that the light is hitting differently.


I hope you found today's post useful. These are just some things that I think about when I'm creating.  Be sure to comment for your chance to win the deeply etched red rubber and while you're at it, subscribe via email so you can keep up to date at what is going on in my craft room.

Until tomorrow, happy stamping!

Monday, June 3, 2019

GIU Day One - Design Principles

Yay, I'm so excited to be your GIU this week! I've decided to bring some basic design principles for card making and scrapping, for that matter. I love to always be learning and why things work and what engages the viewer, so I hope you find these helpful. If not, you can at least look at the pretty cards! Oh, and possible win some deeply etched red rubber of your very own. Who wouldn't want that?

Today's lesson is on grounding. What does that mean? Does it mean always including a ground in your work? No. It simply means anchoring your focal image so it isn't "floating" there, confusing your viewer. There are many ways to ground and most of them don't include dirt.

Grounding to the Ground

Ok, well, one of the ways is to ground to the "dirt". I love the Angie Girl line and I like to make sure the head to toe girls are grounded and not floating on my card base. The brain is confused as to why she's weightless otherwise, even though it is just on paper and 2-D. This doesn't just hold true to people, but objects too.


Grounding to Design Elements

Not all Angie Girls are head to toe. Some are just the torso, so how do you ground these? Glad you asked! You can ground them to the additions you make to your card. Some twine, washi tape, a banner, your sentiment, a die cut shape. This way she isn't a ghostly apparition, just floating there. And as above, the principle works for all sorts of objects. No ghosts carrying vases either.


Grounding in the Sky

Ok, you'd think that you wouldn't need to ground say a hot air balloon or a bird, because they are in the sky and meant to float. No, the brain understands this, but I always feel like my card is more complete if I do anchor these things. Clouds are my favorite way to anchor in the sky, but birds or design elements work too, even a sun. I'm not sure why I feel like they hold up my balloon or whatever, but they do.

I hope you have found this helpful. These are just some of the things I think about when I'm assembling my cards.


Be sure to comment to be entered into the random drawing for a grab bag of deeply etched red rubber, from your favorite stamp company! And be sure to follow me and subscribe via email to keep up to date on what's going on over in my part of the world.

Until next time, happy stamping!

Sunday, July 22, 2018

GIU Blog Hop

I'm baaaaaaack... and happy to be so! Welcome to the May/June Unity GIU Blog Hop. You should have arrived here from Stasia's blog, if you've just wandered here, you can start the hop at Unity's blog. There's a chance for you to win your very own deeply etched red rubber, the best in the Land.

I had a great week and had worked up a fun galaxy card to share today, but then got the wild hair to revisit the theme of all 5 days. I know, I'm a bit nuts, but I had fun using some of the same ideas with the new stamps that had arrived this week, and so I give you....

Shaker card


I love this little seed packet, from Ever Blooming, and it really lends itself well as a shaker card. I used micro beads, mica flakes and a bit of the Audrey Mix. The hubby was a bit disappointed that he was handed a seed packet and all he got was little BBs... I have some other ideas rattling around in the space in my head, so we shall see.

Black On Kraft


I *finally* got around to Giving It All Meaning. Seriously, it's been on my List for some time.  I thought it was the perfect background for this sweet couple I Tolerate You. Hubby thinks it's cute. That's good because it's for him.

Clean And Simple


For this card, I just used the flower from Everblooming, with my favorite "ink with distress, mist, stamp" technique. A few sequins, paint splatters, and a peek-a-boo of washi was all that it needed to be done. Hubby tried to "fix" it. "It's crooked..."

Gelli Plate


I just love this jar of lemonade and the lil tags, from Happiness is Homemade! The hubby was seriously impressed with this one. He's a big fan of the Glossy Accents applied to the jar, though he declared this one not straight too (yeah, it's supposed to be that way, ya dolt!)  It really does do a good job of making it look wet. And I love the fact that when you do Gelli prints, you always have leftovers to pull from. This is one of my ghost prints during my GIU week. I have a drawer of them, just waiting to become awesome, fun backgrounds.

Galaxy Card


And here we come to the card that started us on our reunion tour. I had asked for Look Up And Get Lost as my GIU prize and of course one needs to make a galaxy card with it and Good Vibes also showed up, so that means I need to have another camper parked under the night sky....amiright? I am. I love that there's a little party going on and it's all inviting and festive inside. Hubby did say he'd like to see this thing being towed as the wheels are so far forward. I told him to shush.

So there you have it, I hope you had fun hopping. Remember to leave comments on all the blogs to be in the running for your very own deeply etched red rubber, the best in the Land. Thank you and good night, I'm being hailed by the bird queen, my lemon drop is ready for me!


Friday, June 29, 2018

Growing In Unity - Day Five

Here it is...the last day. *sniff* I saved the big bang for the last day. Several months ago Sandra asked me to do a gelli plate tutorial. I didn't have time then, but then thought it would be a great tutorial for this week, so here you go!

I've had my plates for a few years. I have an 8x10 and the 12x14, which is great for making scrapbook paper. My favorite paper to print on is deli paper. I find mine at Costco like place that caters to the food industry (see what I did there?), but is open to the public. I love the texture it gives and the translucency. The colors never look dull and flat, like I feel cardstock can make them. I love using heavy bodied paint, but you can use all sorts of paint, even distress inks and alcohol inks. Today I am focusing on just one technique, even though there are dozens of things you can do with your plate. I'll be using my 8x10 and deli paper; pulling heavy bodied paint and using stencils.


I have this fun flower stencil (technically it's a mask) that make cute prints.


Apply blops (that's the technical term) of paint onto the gelli. I like to start with my light colors and add the dark later. I've just not had great luck with light over dark.


Gently roll paint onto gelli with a brayer. You don't want to over mix or you lose the color differential, aka mud.


You can see the orange as well as the pink and we're ready for our first pull! Exciting, I know!


Lay whatever paper you're using on top of paint and smooth out, capturing all the paint area.


This is the paint I had after my first pull, so I grabbed another piece of deli paper and repeated the above steps.


Next I laid down my stencil (mask) and applied the darker colors over top, using the "adding paint to gelli and brayering" step from earlier. I took my ghost print and did a soft pull, kinda forgetting that I'm really using a mask, not a stencil, but whatever. I like that you never really know what you're going to get when you play with your paint. I removed the stencil and pulled with my first pull, then still had more paint on my gelli, so I grabbed another piece of deli paper and pulled again!


So for my one process, I got three pieces of cool, one of a kind, patterned paper to use later on projects.


My problem is, I can never stop at just one design so I made these too, using a box stencil. I like how different they look even thought I added paint just once and the different ghost prints look totally different.


I used Circle Scalloped for this card. *note how the circle is placed on a stem and leave set to look like a flower*. I decided that it would be fun to use the paint I used on the print for the circle so I added it to my stamp with my brayer. Just clean your stamp well afterwards.


I did a little paper piecing with one of my box ghost prints.


These clouds are from Sunny Happy Skies. I stamped them on the deli paper, then cut out. I made a sky using a couple of blue distress inks, added my ballon, a sentiment from Sending Up Something Beautiful, and some of the Ariel sequin mix.


If you can, get your hands on a gelli plate; they are so fun to make cool backgrounds and patterned paper with!

I hope you've enjoyed my week here with you, I certainly have, even if I'm simply talking to the wall and a few thousand Russian hacker bots. Be sure to comment to be in the running for everyone's favorite deeply etched red rubber; except the Russian hacker bots, no stamps for you!